Facebook Live was launched back in 2016, and it’s grown – rapidly. It’s a fun and simple way for your business to use the power of video to communicate with your followers.
Whether it’s the launch of a new product or service, an event that you’re holding, or just something fun that shows off your brand personality, Facebook Live can be a great boost to your social media marketing.
Just to put it in perspective for you, here are some stats on Facebook Live:
- 78% of online audiences are already watching video on Facebook Live.
- People spend three times as long watching a live video than a pre-recorded one.
- 82% of viewers prefer live video to social media posts, and 80% prefer watching a live video to reading a blog.
- The average time for watching a Live video is 34.5 minutes, compared to 2.6 minutes for video on demand.
Facebook Live is an easy way to create unique content, and very cost effective – it doesn’t cost a penny, unlike advertising. It also gets a ton of engagement, largely due to the fact that followers get notified when a live video is starting.
Yes, it can be intimidating knowing that you’re live. But it doesn’t need to be! We’ve created this guide to Facebook Live video to help you, including tips and tricks to make your broadcast successful.
How to use Facebook Live: Step by step guide
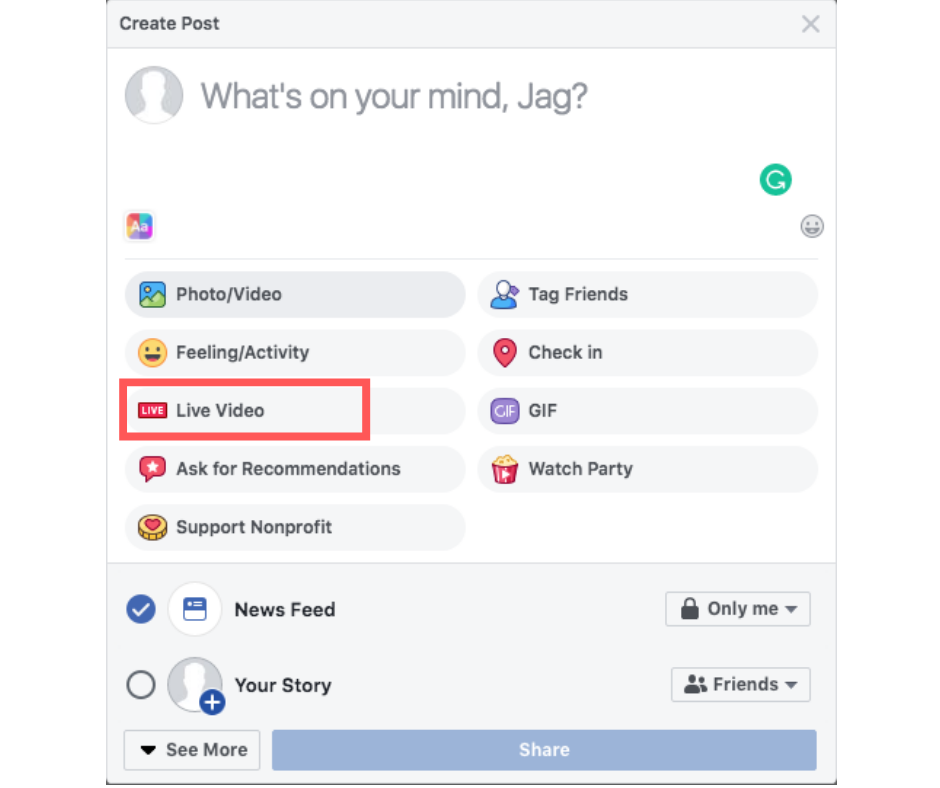
Open Facebook, click to write a post and select “Live Video”

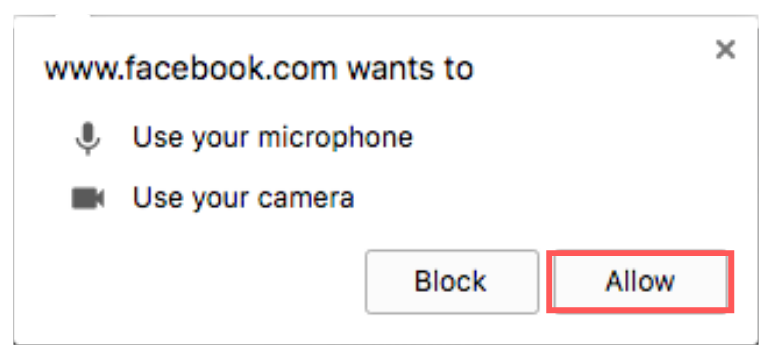
Give access to camera and microphone

Choose privacy settings – you can set it to “only me” if you want to practice first!
Write a compelling description – think of it like a status. It needs to be attention-grabbing, and explain what your broadcast is about.
Tag friends, add a location or add an activity. These add personalisation to your broadcast and can increase visibility.
Click the blue “go live” button to start broadcasting. You’ll get a 3,2,1 countdown, and then you’re live!

Click “finish” to end your broadcast
Click post to keep your video in the news feed after you’ve stopped broadcasting.
It’s really that simple. We’d definitely suggest having a practice first by putting your privacy settings to “only me” – that way you’ll be totally prepared and it will hopefully put your nerves to rest.
So what kind of content should I stream live?
There are lots of different content types you could stream live! You want your live stream to be at least a few minutes long in order to build up traction, so don’t try anything that will be over in a few seconds. Try and think of something new for your viewers, that they won’t have already seen on your page. For example:
- Host a Q&A. Answer frequently asked questions about your business, and invite viewers to comment with more questions.
- Teach viewers how to do something. For example, a makeup tutorial or how to correctly floss your teeth.
- Introduce a new product or service. The key with this one is to build anticipation beforehand, through regular posting to your page or even emailing your customers, letting them know you’ll be making the announcement.
- Give a tour of your location – going behind the scenes, showing how things work, chatting with staff and so on.
- Create a recurring show or broadcast that you can do regularly. This will take a bit of work but it can be a great way to create an engaged community of potential customers.
- Announce breaking news from your business, or talk about a news story that directly affects your industry and give your view.
- Broadcast live events like trade shows, product launches or charity work.
Remember, your live broadcast doesn’t have to be serious or have a business purpose. BuzzFeed gained massive traction on a live video of two staff members butting rubber bands around a watermelon, waiting for it to explode. It went on for around 45 minutes and got over 3 million views!
Tips for your broadcast
Before:
- Promote before you broadcast. You need to generate interest before the event, so post regularly on Facebook in the run-up to your broadcast. Don’t just repeatedly tell your audience you’re going to stream. Every time you remind your audience, share something new of value. For instance, highlight a tip you’ll share, or what kind of information you’ll be covering.
- Prepare by limiting distractions. Make sure you have a space where you’re not likely to be interrupted and try to avoid distracting noises like traffic from outside.
- Test the technical aspects. Remember you can begin with a private broadcast for testing, and use that strategy to test your lighting, sound and other surrounding elements. Make sure you invest in a tripod to avoid the “shaky cam” experience.
- Test your broadband. Poor broadband could result in your connection dropping out, making your broadcast jumpy, or even cutting you off.
- Time it right. Make sure you broadcast at a time when your target audience is likely to be online.
- Use your other channels to promote your broadcast.
During:
- Constantly offer context. It’s likely that you’ll continue to pick up viewers throughout your broadcast, so just re-introduce yourself and what you’re doing every few minutes.
- Be responsive. Live comments and interactions are what make Facebook Live so engaging, so try addressing the comments that appear live on air. It feels more like a conversation with your customers.
- Make sure you’re likeable. This is your chance to really connect with your audience. It’s not about selling a product, but building relationships and trust with your audience. Try and relax, smile, and feel confident.
- Try and broadcast for at least 10 minutes. The longer you broadcast for, the more viewers you’ll attract.
- Don’t worry about any mistakes or stutters. People will respond to you much better if you come across as natural, rather than someone reading from a script.
After:
- Repost your broadcast so people can still watch it even if they didn’t see it live.
- Review and measure using your analytics. You can review your reach, engagement statistics, viewer retentions, and negative feedback. This will help you identify what worked about your broadcast, and what you can improve next time.
Want some more help with Facebook Live, or social media in general? Get in touch, we’d love to help!


